UVA Fugitive – March 1996 Newsletter
This page contains a web-formatted version of the information from the March 1996 Owners Club newsletter.
Pages such as the cover, insurance company adverts and show adverts have been omitted.
Adresses and phone numbers have been removed where believed to be no longer valid.
John’s intro
Welcome to the second club newsletter. This seems about the perfect time to send this out to lift the depression caused by freezing weather and freezing to death in the garage!
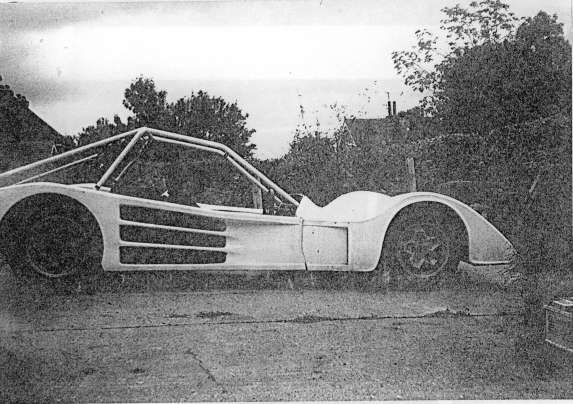
The register is doing really well with around 90 cars now known to me and 26 paid up “keen” members. There are some interesting new cars under construction. Ian Turley has swopped his turbocharged Alfasud engine for a V8 with Holley carb in which he drove to Spain last summer with a rucksack lashed to the back above the engine. Another member built his own frame, fitted a Corona front end and Jaguar IRS rear all powered by a front mounted V8. He drove this up and down the road a few times to prove it worked and then bought a Fugitive frame. The parts are now being swopped over to this new frame and I am assured that there IS room in the front for a V8 and the feet of the driver. I hope he is right. Finally we have an ongoing budget build of the rare F33 Can-Am mid engined Fugitive so things are looking up on the wierdness front!
Enclosed in this issue are all the dates of kit car shows for this year. A stand has been booked for the club for the Stoneleigh show in May. A plan is enclosed. Campers can arrive on the Saturday night if they wish. Camping is allowed on the club stand near the cars. If you don’t want to camp there are actually some basic (but warm) “chalets” available within the showground. These are never advertised but they do exist for exhibitors etc. They are pretty cheap and can be reserved by phoning the showground (not the promoters of the show).
For those who had the first newsletter, the solution to the handbrake problem is a pair of Peugeot 405 front calipers mounted on the Carlton discs at the rear. These are hydraulic and cable operated.
Hope to meet some of you at the show, time to hit the garage
Members Cars
1) At last someone is having a go at a F33 Can-Am.
Michael D. Smith is building a Fugitive F33 Can-Am, although he did not realise it until recently. These are quite rare and the very few appearing for sale are often very expensive. This car was basically a Fugitive 4 chassis which was altered to take a mid engine. The early F33 had cycle style front wings. The chassis manufacturer for UVA at that time made a buck out of wood and paid UVA’s laminators to make him a mould and a set of body panels from it for his own car. UVA kept the moulds and thus the panel set for the F33 Can-Am was born with the testarossa style side air intakes for the radiator. They had to find a new manufacturer of their chassis after that as he reckoned he had been ripped off and refused to make them any more for WA. The moulds and jigs for this kit are now in Italy and the owner plans a race series based around this car.
Anyway this car is interesting as it features a home made engine/transaxle adaptor kit for those with no money. It currently has a Ford Pinto engine and V.W. 13035 gearbox. Rear suspension and discs are Porsche. It has UVA designed double wishbone front suspension. Radiator is Mark 3 Escort and fitted behind and above the heads of the occupants. O.K. unless it boils! Steering rack is Metro with a Corona column.

2) Fiat 2.0 Twin Cam engined F2 of Neil Ginsburg.
Neil is 21 and bought this terminally unwell car in March 95. This car has a Fiat Twin Cam engine with Bosch electronic ignition. The car has been rewired from scratch. This wasn’t too much of a problem as he is an electronic engineering student. It is currently for sale at £1500 with MOT and tax as he hasn’t got any money to run it. Tel: xxx xxxxxxx although at that price it’s probably gone by now.


HOW TO MAKE AN ADAPTOR TO FIT A FORD PINTO TO A VW GEARBOX ON THE CHEAP.
This was done by Mike Smith.
Need 2 pieces of plate.
Drill hole in centre of one, the same size as pilot bearing.
Take piece of round steel to fit through the plate into the pilot bearing.
Clamp plate to engine and make sure it is square to engine.
Mark off the fixing holes of the engine and starter motor onto the plate.
Drill hole in plate to the required size and tap out where original engine bell housing would have been.
Drill starter motor holes.
Second piece of plate:
Drill hole for spigot shaft to fit into. Check for squareness.
Mark off gearbox mounting holes and drill or put studs out from it as the original engine mount would have been.
Drill the centre holes in the plates to the same size.
Use a piece of rod that fits tight in the holes.
I used a piece of 3.25″ machined steel in between the two plates. Thickness of this depends an flywheel and clutch size. Set the 2 plates up with the machined steel in between making sure the two bits are the right way round.
Place the pieces of round tube down through the hole in each piece of plate and make sure the rod is upright using a set square. Also make sure the machined steel is clear of all the mounting holes and fixed.
Tack weld the 2 pieces together. Check for squareness and that everything is OK. Weld up solid.
Cut the centre out of the two pieces of plate to clear the clutch mechanism and starter motor and file out to size.
You now need to make up a drive shaft to fit between the clutch and the gearbox input shaft. This can be done by getting an old gearbox which would have originally fitted to the Pinto engine and clutch and cutting the main input shaft out from it. Find also an old clutch plate that would have fitted the VW gearbox and remove the centre spline. Work out the length of the shaft required. Turn up a piece of steel to fit between the engine clutch shaft and the clutch spline on the gearbox. So: one end of this rod fits into the clutch splines on the clutch disc of the Ford clutch (on the Pinto flywheel). The other end (made from the splines of a VW clutch disc) fits over the splines on the end of the VW gearbox input shaft where it sticks out from the bellhousing. Once all the parts are well aligned and the right length, weld together to make the new shaft.
To make up the clutch release mechanism I had to lengthen the thrust bearing carrier and the mechanism. Work out the length required then turn up a piece of pipe and weld it onto the original thrust carrier in the gearbox.
The release mechanism I did in a very similar way but I welded this to the old gearbox thrust bearing then mounted the new thrust bearing on the end of my lengthening mechanism.
I used the old lever on the outside of the gearbox and mounted a slave cylinder onto the new bellhousing. This makes it a hydraulically operated clutch.
All the above was actually done with a Ford Pinto OHC engine and a Beetle 1303S gearbox. It took 2.5 days in time and about £10 in steel from a scrapyard.
HINTS ON HOW TO FIT G.B. ENGINEERING GEARBOX ADAPTOR BETWEEN A NON V.W. ENGINE AND A SWING AXLE GEARBOX.
TO BE USED IN CONJUNCTION WITH YOUR HAYNES MANUAL!
This kit is about half the price of other adaptors but is a bit harder to fit. You have to fit a new input shaft to the VW gearbox. There is no new flywheel to fit so you retain the donor engine clutch. There is a sliding spacer which fits between the VW clutch release mechanism and the donor engine clutch mechanism. If you use an engine which has the starter motor on the engine side of things (e.g.. Alfasud) then you keep the starter motor as well rather than the VW one.
The input shaft can be changed with the gearbox in the car but only just!
Clean everything up before starting, you need good access to the drivers side of the gearbox (i.e. the right).
1) Loosen large nut holding R rear drum on. Very tight, easier to do with weight of the engine in place and handbrake on plus scaffolding pole!
2) Remove engine.
3) Loosen 3 large bolts holding axle tube to torsion plate on R side. Also undo lower shock absorber bolt. Again these can be very tough.
4) Remove rear drum.
5) Remove 4 bolts and bearing cover plus brake backplate. Must disconnect R rear brakelines first. Handbrake cable does not have to be loosened.
6) Remove wheel bearing visible now at outer end of R driveshaft, easy in Haynes but not in real life.
7) Now look at axle tube where it joins the gearbox:
8) Clean everything.
9) Axle boot off.
10) 8 nuts off to release inner cover. By loosening front and rear gearbox mounts you can jack rear of box up and down by 2 inches or so to help access in the next few stages.
11) Whole car is on axle stands with rear of gearbox able to move up and down and slightly to the side if needed.
12) Axle tube slid off drive shaft. If bearing at outer end wouldn’t shift earlier it will now come off with axle tube plus some welly!
13) Plastic disc slid from gearbox up driveshaft.
14) You now have to undo a large circlip at this point in Haynes to get driveshaft out, This is not essential but it would make the rest easier. I found it impossible to do even with expensive circlip pliers. I know someone who did it with a pair of pointed tipped pliers which had been filed to the right shape at the tips.
15) Undo outer ring of gearbox cover nuts and remove cover. GENTLE tapping with hammer etc. eventually gets it off.
16) Slide this cover up driveshaft along with everything else.
17) Consult Haynes carefully! You now see differential with input shaft running across over it and crown wheel in background.
18) Undo circlip on input shaft. A splined gear has to be slid 2 inches up the input shaft at this point. Rotate differential until there is just enough room for this to be done.
19) Unscrew input shaft and withdraw it from gearbox.
20) Insert new shaft, screw into place, unscrew a fraction of a turn until all splines line up. Tap splined gear down till all splines match up and refit circlip. Splines on new shaft not worn so can be a tight fit just to make life tricky.
21) Can fit new gearbox oil seal at this point if necessary.
22) Reassemble the whole lot! Can fit new brake pads while you are at it and loosen off corroded adjusters.
23) Assembly of the adaptor plate between engine and gearbox is reasonably straightforward.
24) If using an Alfasud engine you will find that the first 4/2/1 section of the exhaust is a perfect fit and can be run up toward front of car without fouling any of the chassis tubes at all.
Have fun!
Engine to gearbox adaptor kits: Cheapest available are: G.B.Engineering, Westfield, Wybunbury Road, Walgherton, Nantwich, Cheshire CW5 7NG Tel: 01270 841081
